Events
Overview
The Portal presents the migration results as Events and provides collaboration functionality enabling the users to keep track of the state of Events, including (new, fixed, accepted, recurring etc.). It also enables users to comment on Events and provides the ability for a user to assign responsibilities for its resolution to specific team members.
For the Business Object the Event presents:
- How many Business Objects of this type that has been migrated successfully and how many were rejected during the migration.
- An aggregation of the Event that occurred for this type of Business Object.
Events enable the user to search or drill down to any specific Business Object to view:
- The Events that occurred for this business object
- Links to any related Business Objects (ancestor and/ or descendants)
- The data that were produced for each step in the migration process
- The data extracted from the source system
- The intermediate result produced by the export engine
- The intermediate result produced by the transformation engine
- The result is produced by the target engine
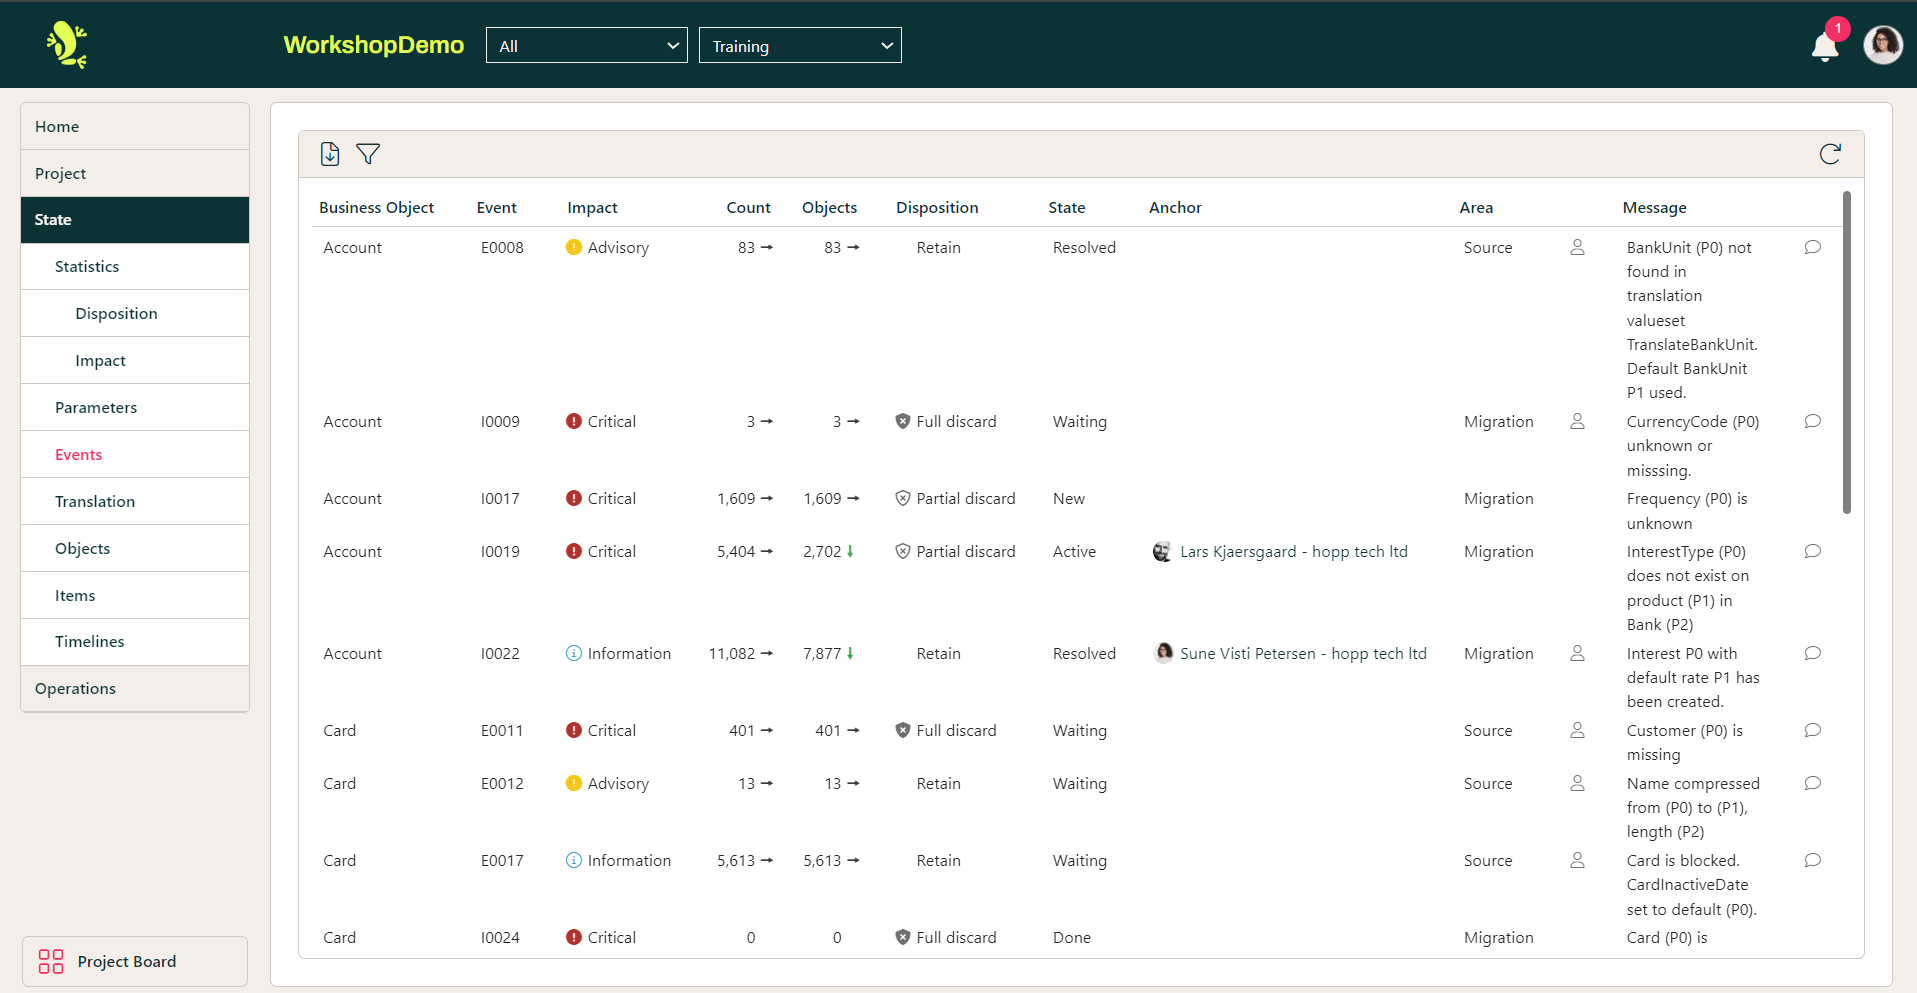
Looking at the Events panel you have a list of all current Events created during the last job iteration. The message for each Event is presented with the space holders for parameters, the actual parameter values have not been merged into the message.
The list contains the following columns:
| Column | Description |
| Business Object | The Business Object on which the Event is created, e.g., Account. |
| Event | The Event Code as created in Hopp by the migration team. Alternatively, this could be the Step where the Event was created (i.e., a “system event”) and the migration team has not created an Event Code for this. |
| Impact | The Impact (Critical, Advisory, Information) assigned to the Event when it was created in Studio. |
| Count | Number of times this Event has occurred. |
| Objects | Number of Objects that have been affected by this Event. An Event can be given several times for the same object (i.e., one client can have the same Event multiple times). Hence, the number of Objects can be smaller than the number in the Count column. |
| Disposition | The Disposition indicates the consequences of the Event occurring on the business object. The consequence can be either Full discard, Partial discard, or Retain.
|
| State | The current State of the Event. The State can have one of the following values:
|
| Anchor | Shows the user responsible for this Event (i.e., the user to which this Event has been assigned). If no user has been assigned yet, the field is blank. |
| Area | Indicates if this should be handled by the Source, Migration, or Target team. (Icon column):
|
| Message | Description of what caused this Event. (Icon column): If there are any Comments on the Event, a speech bubble icon will appear here. Hovering over the image will display the comments. |
| Tags | Any Tags that have been added in Event Processing are displayed here. |
By clicking the Business Object name e.g. Account you go to the intermediate Event list displaying the actual parameter values.
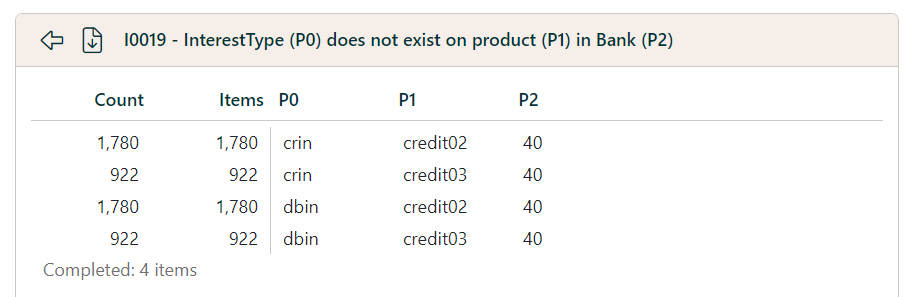
Even though the number of occurrences can be quite large, the intermediate list shows that the problem is this example is in fact limited to a just few missing InterestTypes.
Clicking a line in the Intermediate list takes you to the list of items that fired the Event with this value for the message placeholders. This is also the list you will get from the Items menu item.
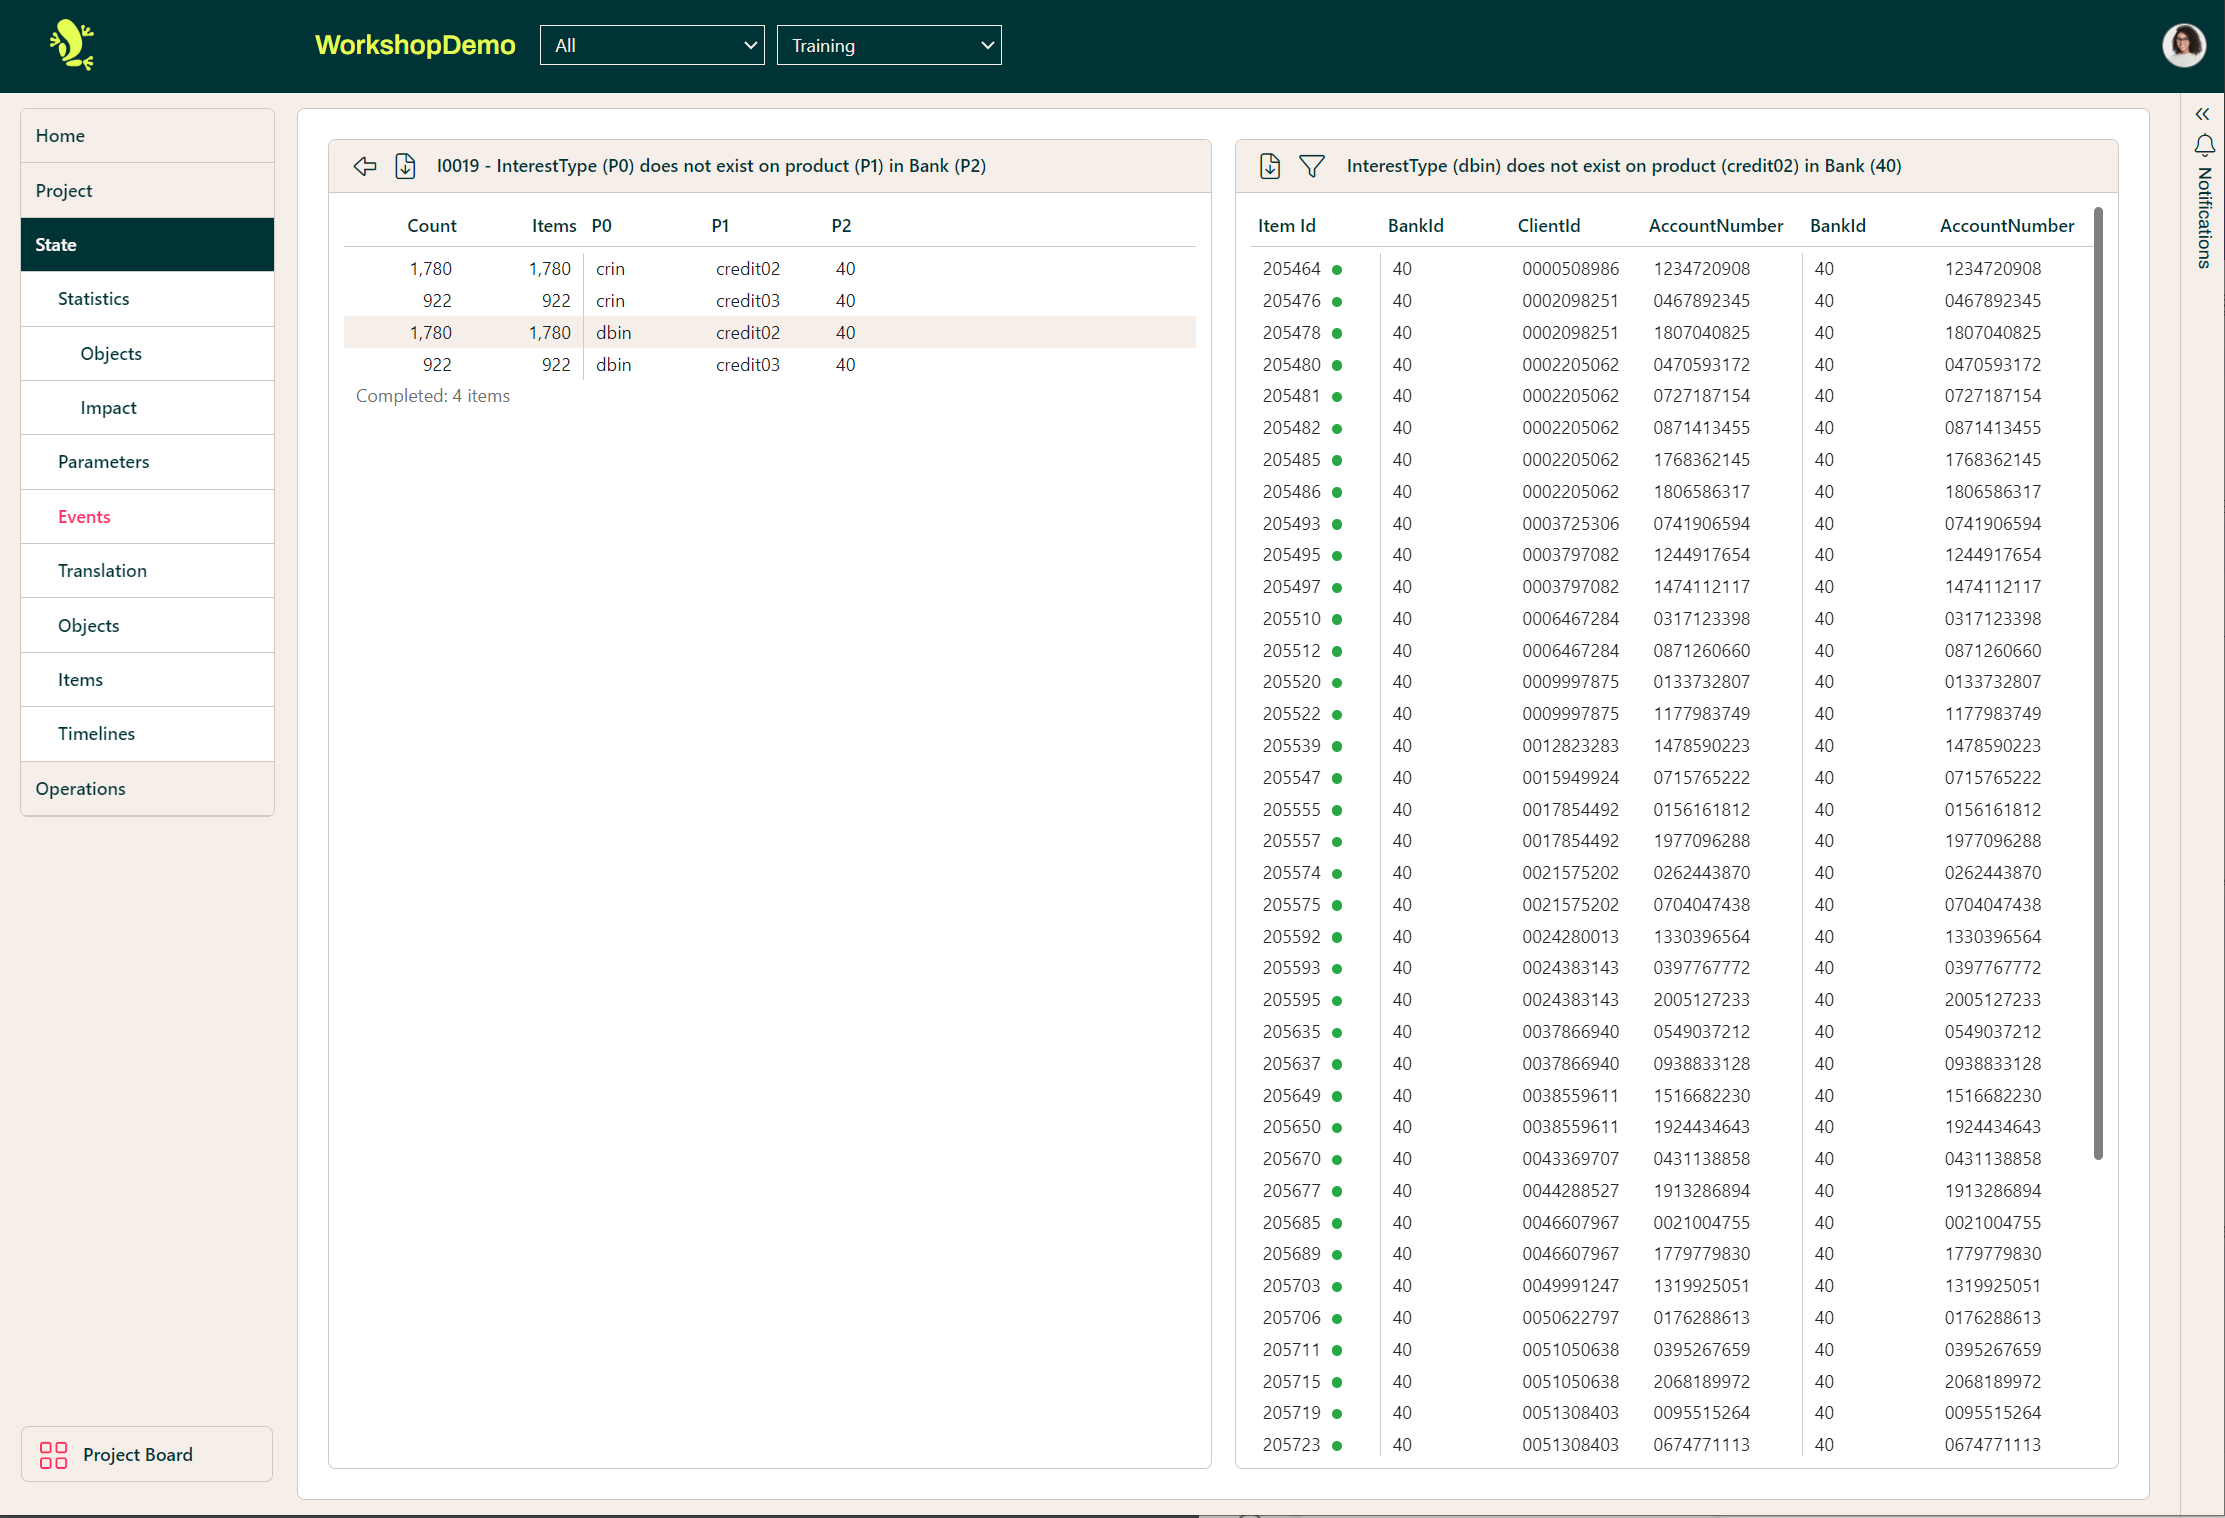
The columns in Item list are:
| Column | Description |
| Item Id | The internal Id of the Business Object instance in the migration database. Click to proceed to the detail view. The migration result for each item is:
|
| Source Key | The key identifying the item in the Source System. This is the given by the discriminator defined on the Business Object in the Source Map (here the values for BankId, ClientId and AccountNumber). |
| Migration Key | The key in the migration. This is the value of the Target Interface Fields that were marked as Key in the Studio Target Map (here BankId and AccountNumber). |
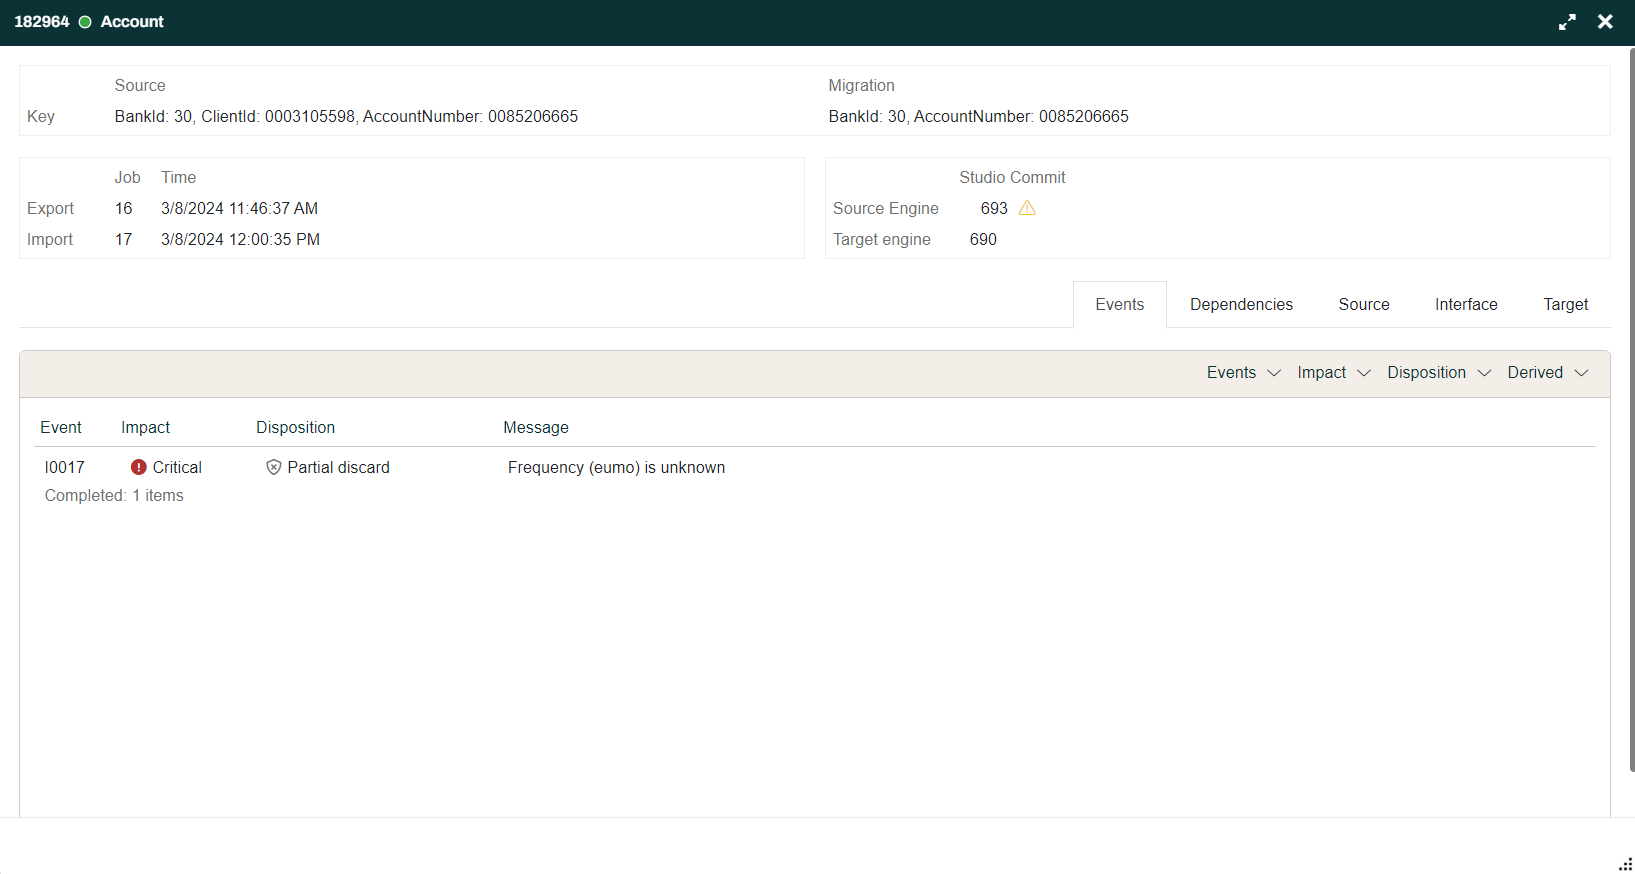
Detail View
Clicking the Item Id in the Item list proceeds to the detail view. Here all information for one specific Business Object instance is displayed in a consolidated view:
-
The same Key information as is visible in the list
-
Information of the jobs in the Runtime that ran the Export and Import of this item
-
The Studio commit ids of the Source- and Target Maps tells you on which basis the item was processed. You can locate these commits in Studio to see the exact state of the maps that were used. A yellow warning means that the user had one or more items in Studio checked out locally when the engine was generated
-
Any child items which depend on this item as defined by relationships in the Target Map
-
All the Events that were fired when this item was migrated
-
Tabs to show the actual item data that were processed for this item, see below
Use these dropdown filters to narrow list if its is too long:

Dependencies Tab
The Dependencies tab shows the dependencies of this Business Object as defined by the Relationships in the Target Map.
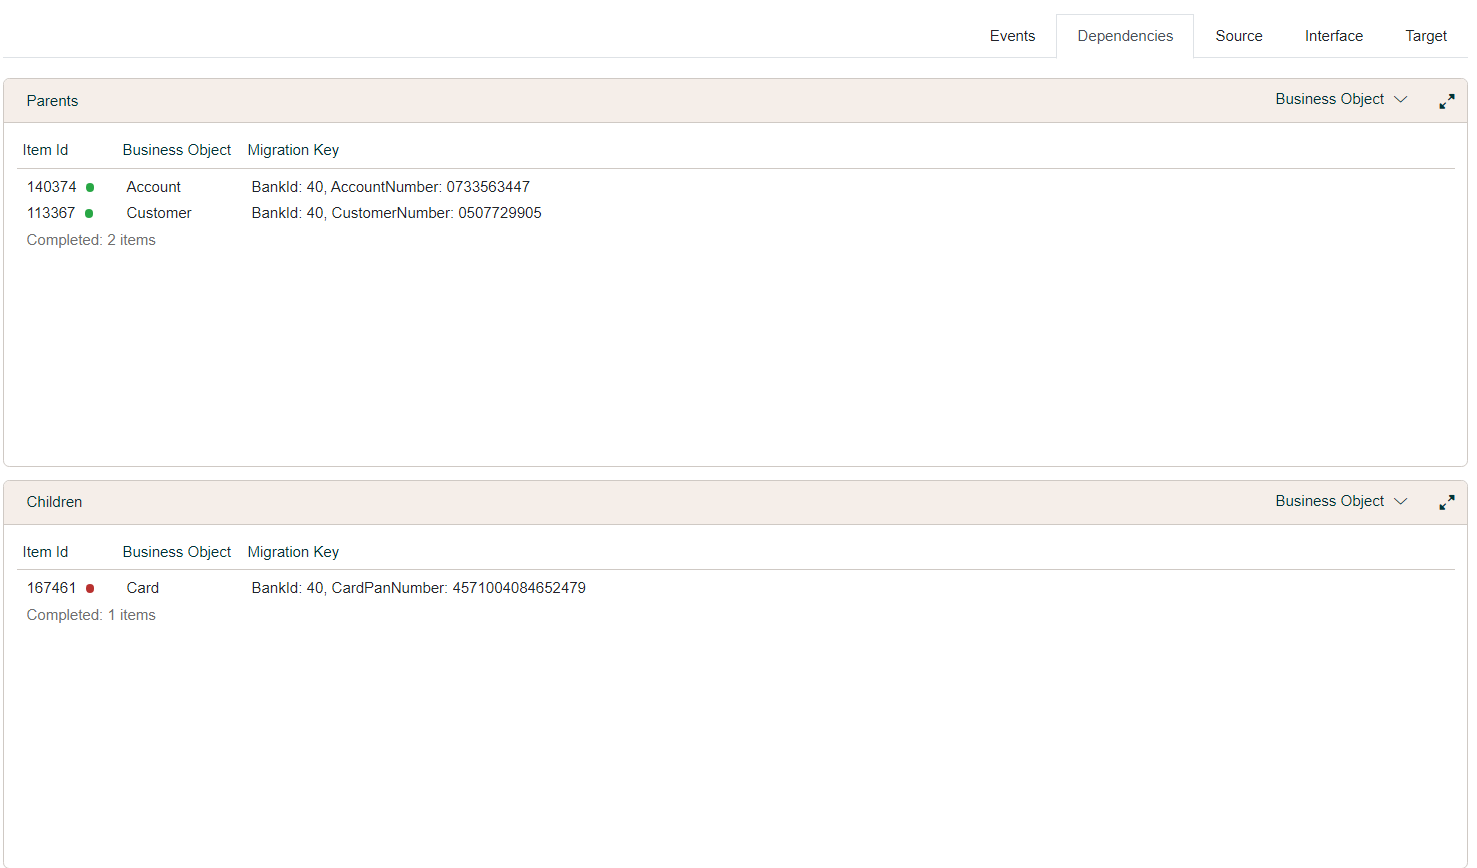
Parents shows that this Account Business Object depends on both a Customer and also another Account.
Children shows that a Card is depending on this Account
Clicking the ItemId link for any dependency will open the dependency Business Object
Item Data Tabs
Use the tabs to get to a consolidated view of relevant data for this specific item by selecting the Source, Interface or Target Tab.
Here the Portal presents you with all the data that were in use for the entire hierarchy defined in Studio for this Business Object.
This view is data lineage taken to a new level and indeed something that is very useful for testing and validation.
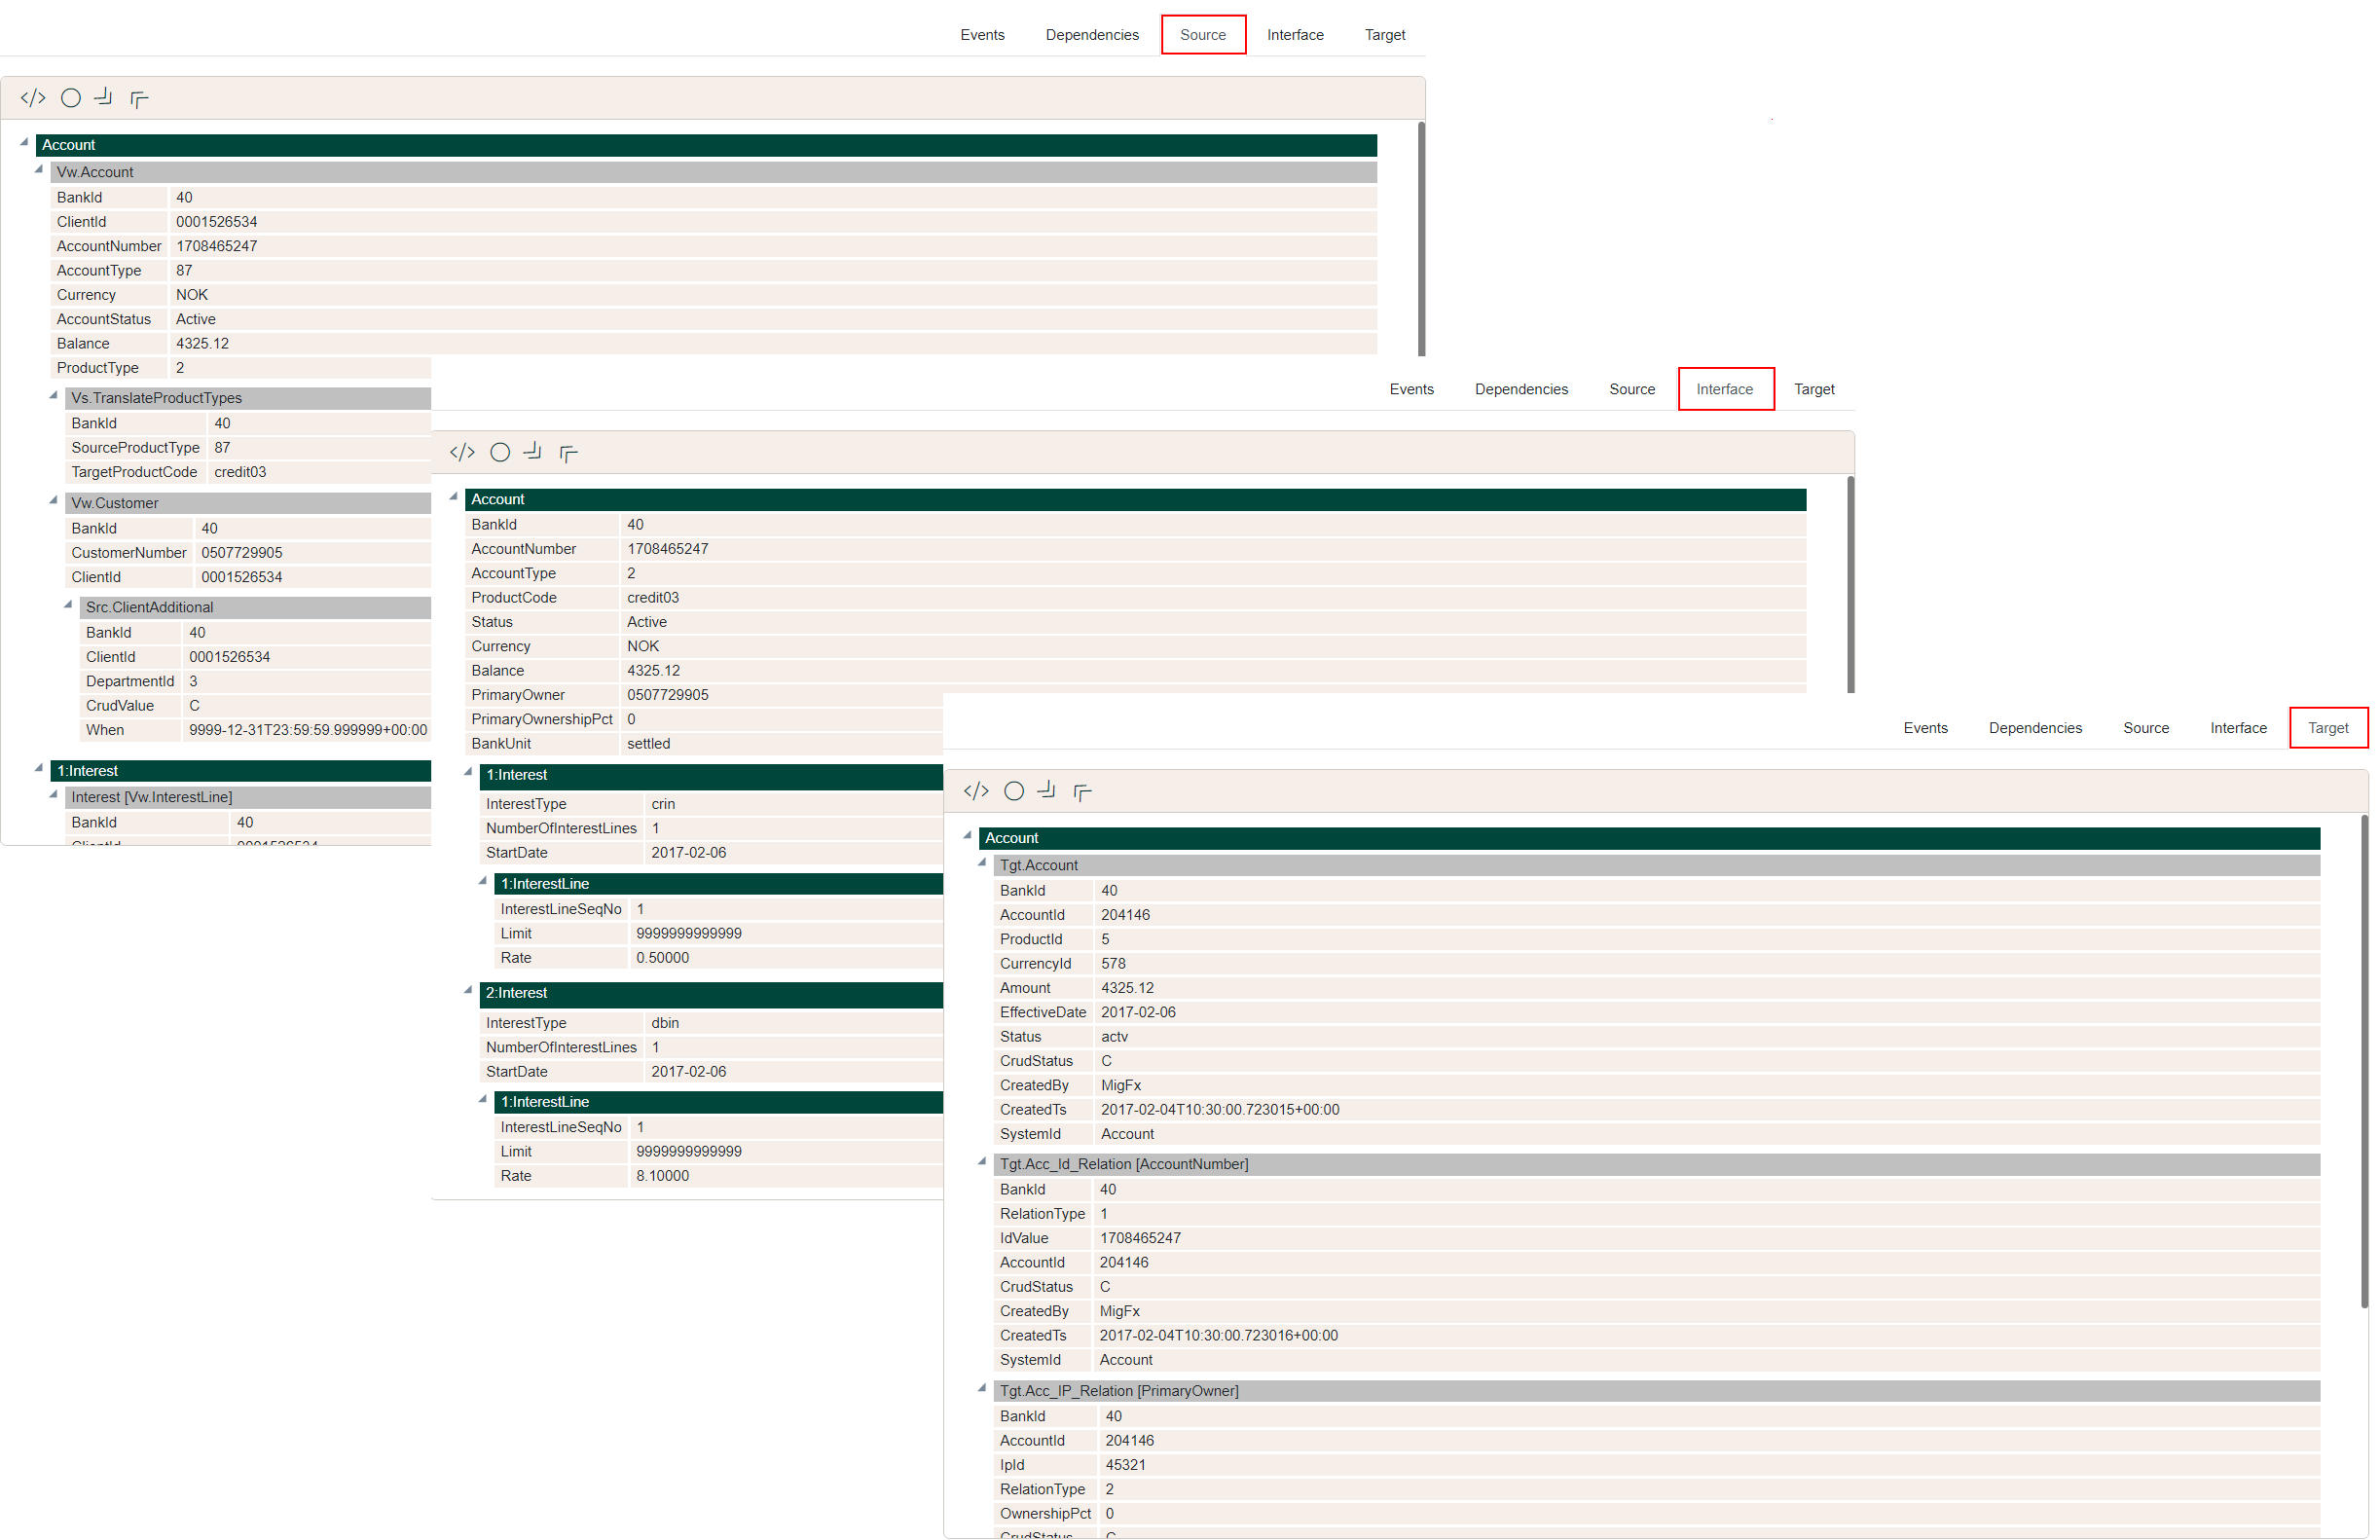
The screenshots above shows the data hierarchies for an Account Business object.
Navigate to a Card item in the Portal and you will easily recognize the hierarchies you have been working on in the Source- and Target Maps.
| Tab | Description |
|---|---|
| Source | The data that was extracted from the Staging database to serve as the foundation for the migration of the item. |
| Interface | The data that was produced by the Source Engine and sent on to the Target Engine through the Business Object interface |
| Target | The result produced by the Target Engine, ready for delivery to the Target System(s) |
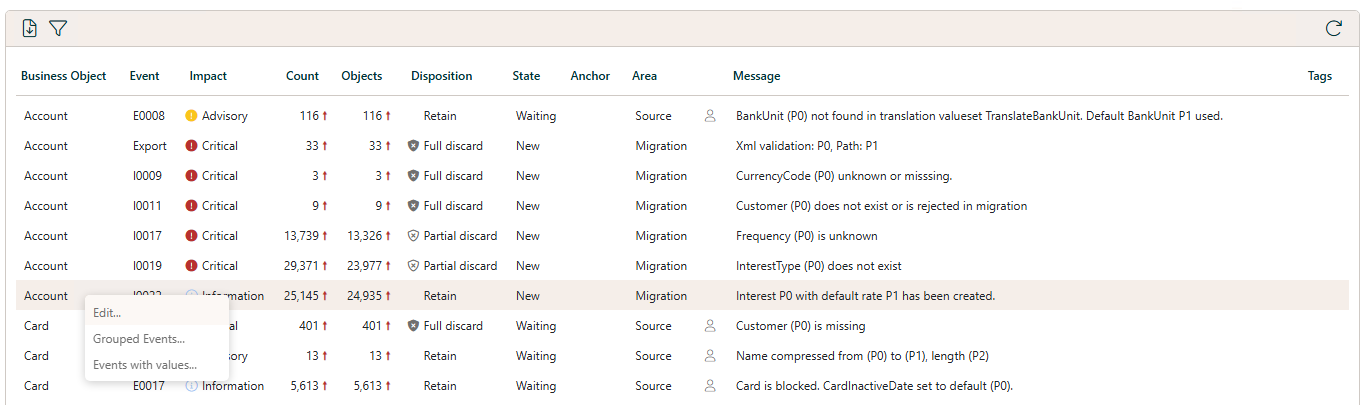
Processing Events
The Portal supports a workflow around the Events to ensure that all Events are being considered and that all Events are subject to a final sign-off.
This means that before the migration goes live, all Events should either be resolved, so they no longer occur or be accepted. Accepting an Event means actively acknowledging that the Event occurs and that this is acceptable when going live.
This page will look at how to use the Event Editor to:
- Change the User State
- Delegate the Event processing to Partition Users
- Comment events
- Mark Events as derived from other Events
![]() The Event Editor is different depending on whether you are a Team user or a Partition User
The Event Editor is different depending on whether you are a Team user or a Partition User
To edit the event, click Edit... in the context menu.
Event Editor
The Event Editor shows static information from the Event itself that cannot be modified:
- ItemId, Business Object Name, and the Event Message
- The Event Severity and Area
- The Counts and baseline delta
The Event Editor is different depending on whether you are a Team User or a Partition User.
Team User
If you are a Team User you have access to All partitions. This is the Event Editor as you see it when you have selected the All partition.
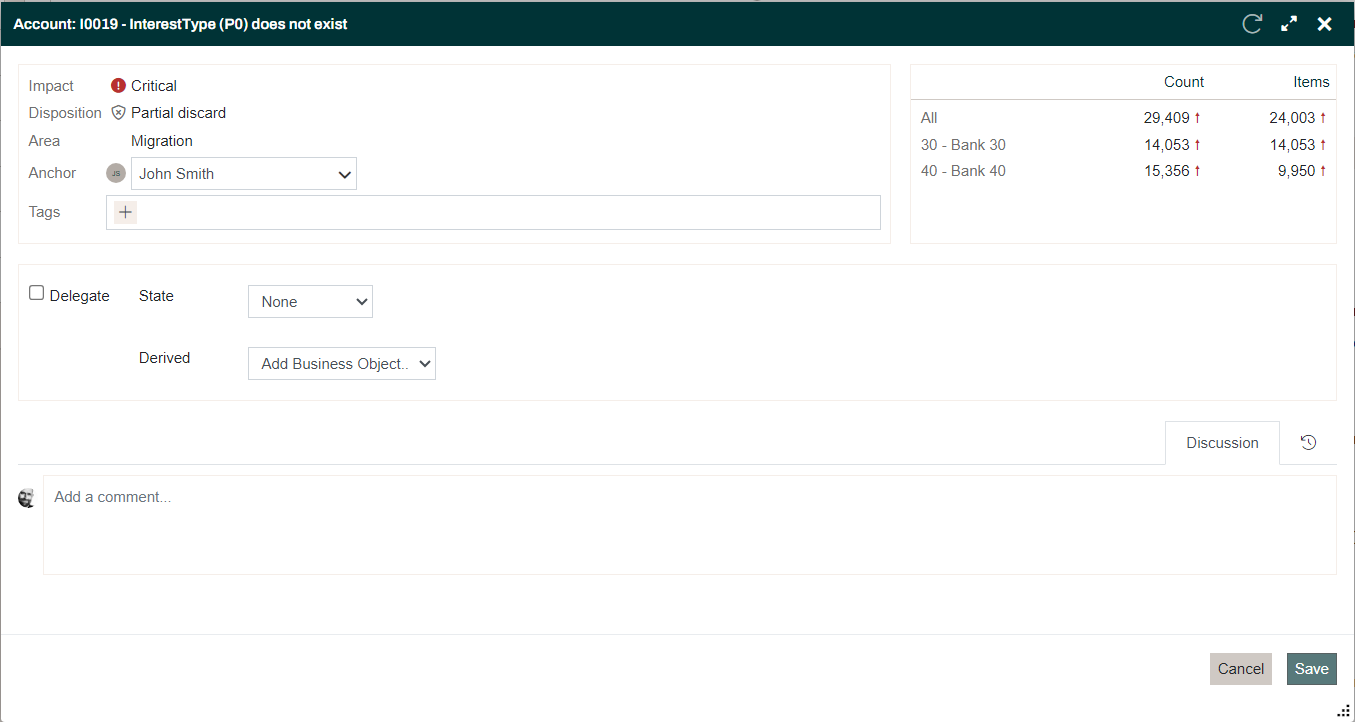
Initially, you can select a team user to be the Anchor for this Event.
Next, you decide how this Event should be processed, namely whether the migration team should handle it or whether you want to delegate it to the Partition User(s).
-
Not delegated: In the screenshot above, the Event is not delegated (no check in the Delegate box). This means that a Team User can set the State and also decide if this Event is derived (caused by) another Event.

-
Delegated: If, on the other hand, you decide to delegate the Event, Team Users can no longer set the State nor make the event derived from another.

Instead, you can see - read only - the user and state set by users for each Partition in the migration.
User State
When editing the details of a given Event, a Team User, or a Partition User if the Level is Delegate, can change the State of the Event to one of these possible States:
| State | Description | Comment |
| None | No State has been set | New Events are created with this State |
| Resolved | Some action has been taken and this Event should not occur in the next iteration | |
| Regression | The State was set to Resolved, but the Event occurred anyway in the last iteration | This State is set automatically by the Portal on Publish |
| Active | The Event is currently being worked on | |
| Accepted | It is accepted that this Event occurs and it will not prevent a final sign-off on the migration |
These are the States that can be set manually on an Event. When the Event is shown in the Events list, this State in combination with the baseline comparison is translated to a List State
Discussion Tab
On the discussion tab, you can have a conversion and assist others in the resolution of the Event.
History Tab
Finally, on the History tab, you have a complete history of everything that happened for this Event - when and by whom.
This includes edits done by the Portal, when counts are changed during Publish, and also if State is set to Regression by the Portal.
