Publishing Maps and Deploying Engines
Once your mapping in Studio is consistent, the next step is to apply it by migrating some data and seeing how it goes. In Hopp, you generate a new engine from your map and deploy it so the Runtime can discover and load the new version of the engine.
This page explains the steps to take to deploy a new engine and get it loaded and ready to run migrations.
The figure below illustrates the necessary steps to take to deploy a new engine to Runtime. The process is identical, regardless of whether you are deploying a Source Map or a Target Map.
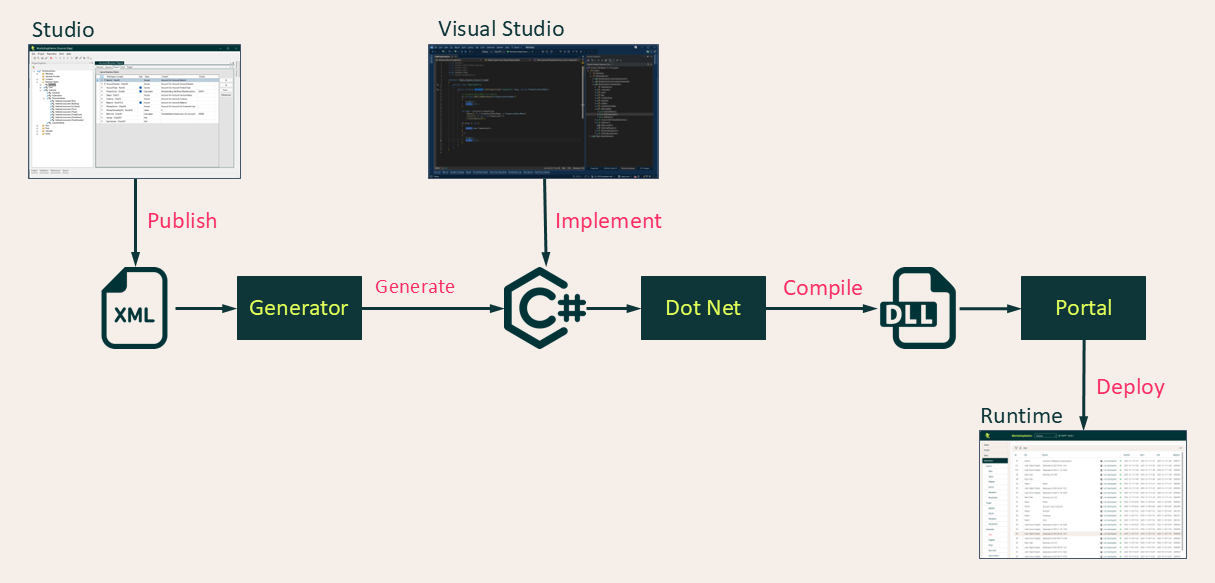
- Publish
- The validated Map is published from Hopp Studio to an
XMLfile - Generate
- The Engine Generator reads this file and generates the Engine code implementing the entire mapping in a number of
C#files - Implement
- If necessary, Manual Rules and/or Bags are implemented or modified in Visual Studio. In many cases, this step is skipped because there are no changes to any manual rules or bags in the published map
- Build
- The entire engine and dependencies are compiled using the Dot Net
C#compiler (MSBuild) - Deploy
- The resulting load libraries (
dll's) are zipped and transferred via an authorized Portal API. The Runtime will automatically detect the new version (Revision) of the new engine and load it in subscribed tracks
This entire process can either be launched from within Hopp Studio or you can publish from Hopp Studio and switch to Visual Studio in order to do some manual rule implementations before proceeding with the deploy.
Once an engine is deployed, it will be automatically loaded by the relevant tracks using that engine.
You can read more about engine subscription here: Engine Subscription
Deploy from Studio
Once you have validated your Map, you can publish it. Choose the Publish to Engine item in the Project menu in Studio
(or press Alt+G).
Studio will not let you publish a map until it is validated and has no validation errors.
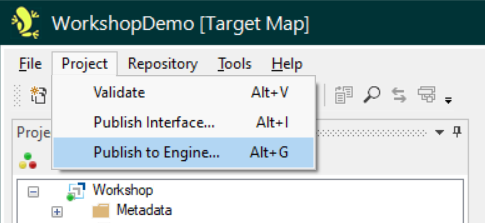
If your changes in the Map being published only concern the mapping itself and you haven't added or modified any manual rules or bags, you can generate and deploy the engine right here from Studio.
If you have added or modified manual rules or bags, you can choose to Publish and Generate only from Studio. After the publish, you can switch to Visual Studio, do the necessary implementations there and proceed with Deploy from Visual Studio
Publish Dialog
Studio opens a dialog to prompt you for the path to the XML file where it is going to save the entire map, and for what you want to happen after the publish
is done.
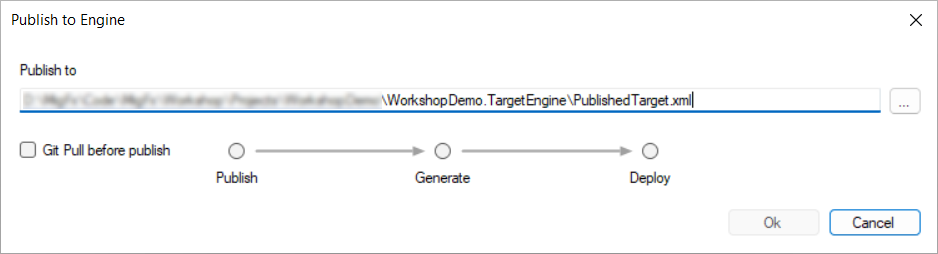
| Publish to | The path to the published Studio and the Code Generator must agree on this file location. The file resides within the Visual Studio Project for the given engine. You only have to provide this path the first time you publish a given Map. For all subsequent publishes, Studio will remember this path for you. |
| Git Pull | Optionally do a git pull before the publish. If you are committing the published XML file to a remote If you have exempted the published XML file from git (in |
| Action | The 3 radio buttons let you decide how far to go from here in Studio. You can Publish only:
or Publish and Generate:
or Publish, Generate and Deploy:
If you go all the way to Deploy, Studio will compile for you and send a request to the Portal to deploy the engine. This will in turn display the Deploy dialog, see Deployment below. |


Once you click the Ok button, Studio will write the entire map to the specified XML file.
If the Action is not Publish only, Studio will then proceed to carry out the selected Action.
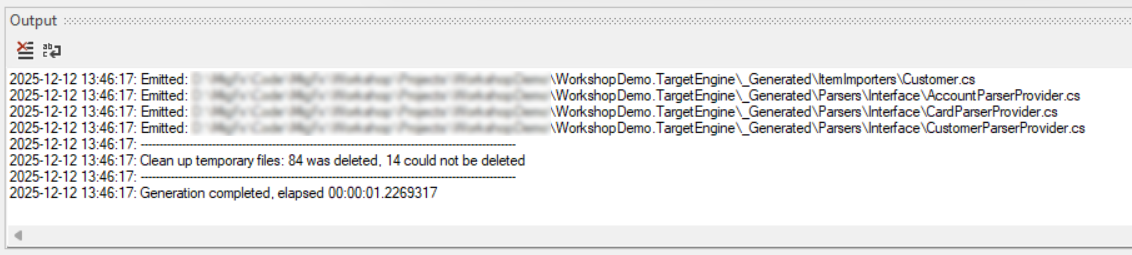
Deployment Output
If you have chosen to proceed from there, Studio will display the Output tool window to log the output from the actions you have selected.
Studio Portal Options
You must provide the information that Studio needs in order to connect to the Portal. This is done in the Options dialog:

These options are shared between Hopp Studio and Visual Studio. If you change them in one place, your changes will also take effect in the other.
Deploy from Visual Studio
If you have manual rules or bags to implement, you may choose to do only the Publish from Studio, and then switch to Visual Studio and do the Generation.
Then you can work on the implementations in Visual Studio and finally - when you are ready - do the Deploy from Visual Studio too.
Generate
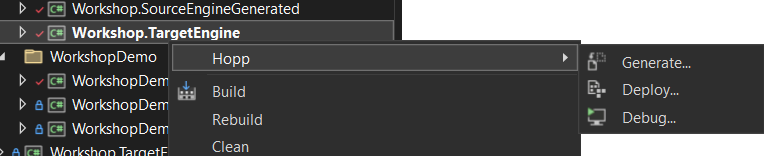
You launch the generator from the context menu of the project in Visual Studio. For the Source Engine, this is the *.EngineCustom project.

Once you click the Generate... menu item, Visual Studio will show a dialog with the path to the published XML file it will read to generate the code. This must be the same file that Studio wrote the published Map to in the previous step.
As a sanity check, the dialog will display the age of the published file — in red if the file is more than 10 minutes old.

When you click the Ok button, the generator will launch. You can follow the progress in the Visual Studio Output tool window
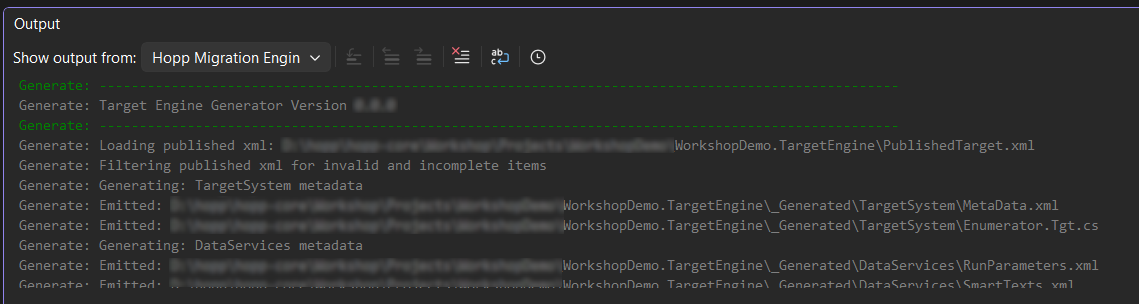
Deploy
To Deploy, simply choose the Deploy... menu item from the same context menu in Visual Studio from where you launched the generator.
Visual Studio Portal Options
You must provide the information that Visual Studio needs in order to connect to the Portal. This is done in the Options dialog:
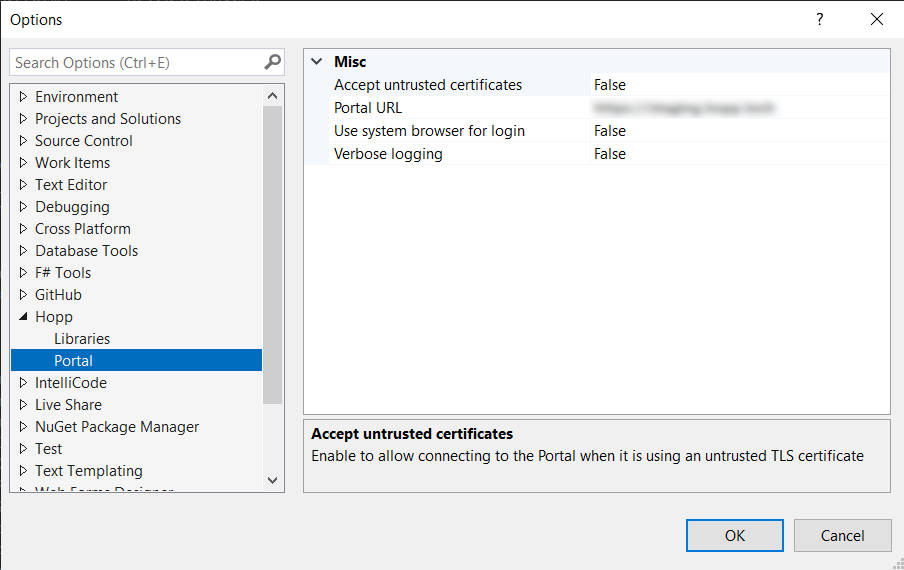
These options are shared between Hopp Studio and Visual Studio. If you change them in one place, your changes will also take effect in the other.
First, Visual Studio will compile (build) the engine. For the actual deployment, Visual Studio will display the Deploy dialog; see Deployment below for what happens next.
Deployment
The Portal connects to the runtime environment. In turn, the runtime environment knows which tracks are using the engine being deployed.
Whether activated from Hopp Studio or Visual Studio, the Deploy application will now be launched.
Authenticate
The deploy will first authenticate you in the Portal and ensure that you have sufficient authority to deploy engines. How authentication takes place depends on how the Portal is configured in your installation.
As an example, if the Portal is configured to use the in-application login form, the authentication will look like this:
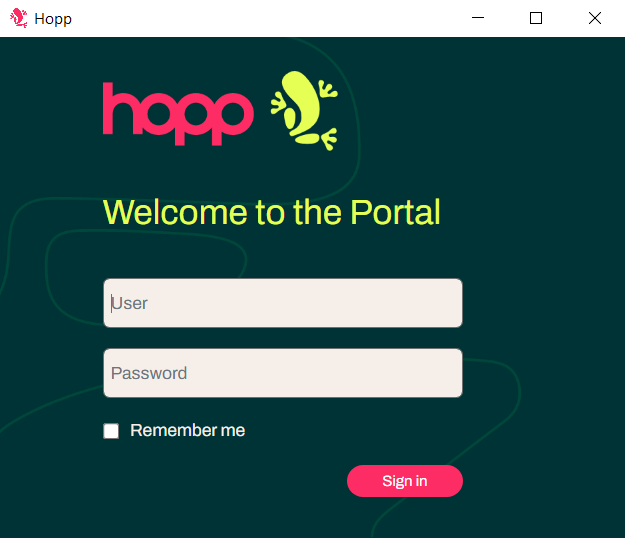
If configured differently, the Portal may sign you in silently. In any case, the Portal will remember your credentials for a period after your sign-in, so this is not something you will experience very often.
Deploy
Once through authentication, the Deploy dialog shows up.
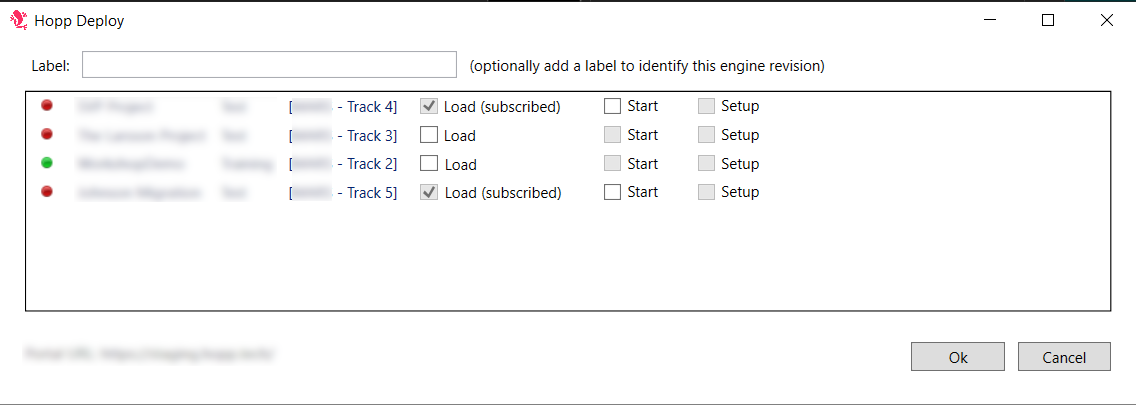
You can optionally provide a label for this deployment. The label will appear in the Portal and clearly identify the engine revision
resulting from this deployment. Read more about engine revisions here: Engine Subscription
The dialog then lists all the tracks in the runtime that are using this engine. For each track, you have these options
| Indicator | Red if the track is currently stopped, Green if running |
| Load | Determines whether the track will load the new revision. When a track auto-subscribes to the deployed engine, the Load checkbox is disabled and checked, indicating that the track will automatically load the new revision. If a track is not auto-subscribed, you must check the Load checkbox for the track to load the new revision. If the Load checkbox is not checked, the track will not load the new revision. |
| Start | If the track is currently stopped, a check here will cause the track to start and load the new engine revision. The Start checkbox is only enabled, if the Load checkbox is checked and the track is currently stopped. If the Load checkbox is checked, but the track is currently stopped and Start not checked, the new engine revision will be loaded when the track starts |
| Setup | Check here to run the setup of the new engine. Disabled if the track is not currently running and the Start checkbox is not checked. If checked, setup will not run until the track has loaded the new engine revision. If changes in the engine being deployed will cause the setup to modify the track and potentially drop any staging artifacts, a dialog is shown for you to accept these consequences. |
Deployment of a new Engine Revision and the subsequent automatic load of the new engine will only affect jobs submitted after this point.
Any jobs already running when the new Engine Revision is automatically loaded are unaffected. These jobs will continue to completion using the Engine Revision that was active at the time of submit.
Load of new revision
When a track receives a new revision it will immediately load it. Load of the new revision is marked in the job list together with information of who deployed it, and when
