Setting up the Master Server
The Master Server is central to the Hopp installation. It is the Master Server that hosts the Portal Web application and its required databases.
In general, the Master Server is in charge of the central configuration of the Hopp installation. All Execution Servers look to the Master Server for guidance.
Configure Folders
Recommended folder structure on Master Server
- D:\MigFx
- Database: Master, Repository and Portal database files here
- Project: Project Database files here (when setting up a new migration project)
- Runtime: The MigFx Service Account must have full control access to this folder
- Temp: the Director Runtime will use this folder for temporary files
- Web: Root folder for the IIS default web site
- Database: Master, Repository and Portal database files here
Create Databases
Install SQL Server following the prerequisites in the Installation Overview.
Note: Please ensure that all databases are created with the same SQL Server collation.
- Create database
MigFx_Masterand run setup scriptMigFx.MasterDb.Setup.sql. - Create database
MigFx_Repositoryand run setup scriptMigFx.RepositoryDb.Setup.sql. - Create database
MigFx_Portaland run setup scriptMigFx.PortalDb.Setup.sql.
Deploy the Portal
The Portal is a Blazor Web Application that must be hosted on a web server supporting .NET.
This can either be an Application Service in a cloud infrastructure such as Microsoft Azure, or it can be an Internet Information Service (IIS) hosted on a server in your infrastructure.
Below is the guidance for deployment under IIS.
Configure IIS
-
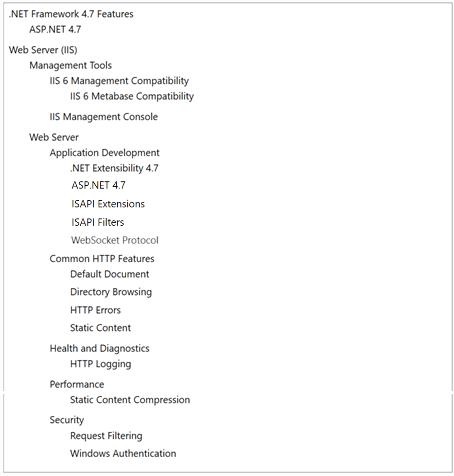
Use Server Manager to install IIS with this configuration (.NET version numbers in the screenshot may be obsolete, please use the newest available).
-
Windows Authentication is only required if you plan to use the Windows identity provider in the
appsettings.jsonof the Portal (see below).- Note: Windows Authentication is deprecated and will be removed in a future version of Hopp. It is strongly recommended to use either in-app authentication (login form) or External Authentication. See article: Setting up External Authentication.
-
Install the .NET Core Hosting Bundle.
- Note: It is important that the Hosting Bundle is installed after IIS.
Configure SSL
The site bindings of the Portal must be configured for HTTPS with a valid SSL certificate. The Portal will refuse to run if not under HTTPS.
You should provide a valid SSL certificate issued by your organization as mentioned under prerequisites in the Installation Overview.
Authentication
- Anonymous Authentication must be enabled.
- Windows Authentication must be enabled if you plan to use the Windows identity provider in the
appsettings.jsonof the Portal (see below).
Physical path
It is recommended to set the physical path of the Default Web Site to the Web folder in the MigFx folder hierarchy (see above).
Application pool
It is preferable to run the Portal Web Application under a separate, dedicated application pool. Suggested name: Hopp.Portal.
Configure the App Pool to run under the Hopp Service Account.
Deployment
The Portal can be deployed either as a Web Site or as an Application under a Web Site. The simplest setup is to deploy as a Web Site. You should only consider deploying as an Application if you plan to host other applications next to the Portal on the same Web Site.
If you want the Item Manager or Planning modules included, use portalwithmodules.zip in place of portal.zip everywhere below.
The deployment procedure is identical. See Configure Optional Modules below for the database and
connection string setup that goes with the modules.
-
If you are deploying as a Web Site, copy the contents of the migFx folder from the
portal.zipfile to the physical path of the Default Web Site. -
If you are deploying as an application under the Web Site:
- From the
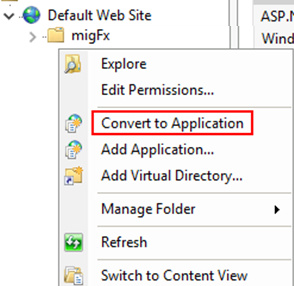
portal.zipfile, copy the migFx folder itself to the physical path of the Default Web Site. - In IIS Manager, refresh the Default Web Site and right click the migFx folder under the Default Web Site and Convert to Application.
- From the
Portal settings
All settings for the Portal are in the appsettings.json file in the root of the deployment folder. Below is the guidance on how to modify
the settings in this file.
Bear in mind that the .NET configuration system will prioritize appsettings defined as environment variables on the machine hosting the Portal over the settings defined in appsettings file. The convention to follow in order to override appsettings with environment variables is quite straightforward: https://learn.microsoft.com/en-us/aspnet/core/fundamentals/configuration.
If the Portal is hosted in a cloud infrastructure, it is typically not an option to edit the appsettings.json file and the settings are normally defined as
environment variables for the cloud app service.
When self-hosting the Portal in IIS the settings can be provided in the appsettings.json file or optionally as environment variables. If the file
is modified, it will be necessary to preserve these modifications when deploying future releases of the Portal.
Edit the appsettings.json file
Be careful when editing JSON. Any backslash must be duplicated for the JSON to parse correctly.
-
Set connection strings
- MigFxPortal: the
MigFx_Portaldatabase created above. - MigFxMigration: the
MigFx_Masterdatabase created above.
- MigFxPortal: the
-
In the Authentication section:
-
Set the PortalUrl to the URL that will be used to access the Portal.
- Note: This is the URL users will enter in their browsers to access the Portal. Enter it even when accessing
from the server itself;
localhostwill not work.
- Note: This is the URL users will enter in their browsers to access the Portal. Enter it even when accessing
from the server itself;
-
Set IdentityProvider to specify the authentication flow to use for the Portal.
-
Windows: The Portal will use the standard NTLM Negotiate flow to obtain an authenticated Windows user from the browser.
- Note: Deprecated.
-
Form: The Portal will show an application sign-in form requesting user id and password.
-
External: The Portal will use an external identity provider, for instance Microsoft Entra ID. See the article Setting up External Authentication for how to configure the Portal for an external identity provider.
-
-
-
For first-time setup, uncomment and edit the seed user to create the first user in the Portal. Once created, the seed user should be commented out or removed from
appsettings.json.
Edit the Index.html
Note: Only if you are deploying as an application under the Web Site. If you are deploying the Portal directly under the Default Web Site, you do not have to edit this file.
- Edit
wwwroot/Index.html: set the base href tomigFx:<base href="/migfx/" />.
Optional: Create and use a certificate for signing of JSON Web Tokens
By default, the Portal will create and use a transient certificate to sign the JSON Web Tokens of authenticated users.
This is normally sufficient. However, in some scenarios, it may be required to use a persisted certificate for the signing of JSON Web Tokens.
In this case, you can create and install a certificate and reference this from appsettings.json:
The certificate must be created with an RSA private key. See Creating RSA Keys using OpenSSL.
These are the openssl commands to create a certificate with a 1-year expiry:
openssl genrsa -out private-key.pem 3072
openssl rsa -in private-key.pem -pubout -out public-key.pem
openssl req -new -x509 -key private-key.pem -out cert.pem -days 360
openssl pkcs12 -export -inkey private-key.pem -in cert.pem -out cert.pfx
Note: Be aware of the expiry of your certificate. You will need to configure a new certificate in time to avoid disruptions.
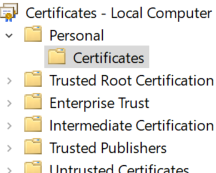
Install the certificate on the Master Server. Recommended install location is Local Computer/Personal:
In the Authentication section of the appsettings.json, uncomment and update the SigningCertificate section to identify the certificate installed above.
Optional: Configure file transfers via cloud storage
By default, the Portal and the Hopp Runtime will exchange files using the Temp folder on the Master Server (see Configure Folders above).
Optionally, you can switch the file exchange to Azure Blob storage in Microsoft Azure.
The choice between a local folder and Azure Blob storage is made in the FileStorage section of the Portal appsettings.json file:
"FileStorage": {
  "Provider": "Local", // Local or AzureBlobContainer
  "Local": {
    "Path": "D:\\migFx\\Runtime\\Temp" // Please set the local path to a folder reachable to both the Portal *and* all execution servers
  },
  "AzureBlobContainer": {
    "ConnectionString": "(not set)",
    "ContainerName": "(not set)"
  }
}
Configure Optional Modules
Hopp ships with two optional modules: Item Manager and Planning. Each module needs a database, a connection string, and binaries deployed alongside the Portal. This section covers all three. Only the steps for the modules you plan to install are required.
Choose an install option
There are two ways to get the module binaries onto the Master Server.
-
Bundled. Download
portalwithmodules.zipfrom the Hopp download page and deploy it in place ofportal.zip. The zip contains the Portal with both modules already included. The deployment procedure is identical to the one in Deployment above. -
Selective. Keep
portal.zipand downloadext-itemmgr.ziporext-planning.zipfor the modules you want. After the Portal is deployed, follow theReadMe.txtinside eachext-*.zipto place the module files.
Pick the bundled option if you want both modules and the simplest deployment. Pick the selective option if you want only one module, or if you need to update modules independently of the Portal.
Create the module databases
Create one database per module you are installing. Use the same SQL Server collation as the other Hopp databases (see Create Databases above).
- Create database
MigFx_ItemMgrand run setup scriptMigFx.ItemMgrDb.Setup.sql. The script is included inext-itemmgr.zip. - Create database
MigFx_Planningand run setup scriptMigFx.PlanningDb.Setup.sql. The script is included inext-planning.zip.
The setup scripts live in the ext-*.zip files regardless of which install option you chose. If
you deployed portalwithmodules.zip you still need the matching ext-*.zip to get the database
setup script.
Add the module connection strings
Edit the Portal appsettings.json file and add a connection string for each module you installed,
to the same connection strings section as MigFxPortal and MigFxMigration:
- MigFxItemMgr: the
MigFx_ItemMgrdatabase created above. - MigFxPlanning: the
MigFx_Planningdatabase created above.
Upload Hopp Runtime
Once the Hopp Portal is up and running, you can download the Runtime.zip from the Hopp download page and upload it to the Portal here:
